Google Slides is a versatile tool with more than 800 million monthly users to create presentations, lectures, and more. But as an instructional designer who’s created countless online learning modules, I can tell you that even the best slideshow tool can’t overcome a boring, bland presentation, and a lot of times, that’s exactly what a presentation without audio is.
Audio can be a game-changer for any presentation. It can transform a run-of-the-mill slideshow into a captivating experience. While visuals convey information, audio adds depth, emotion, and impact to your message.
Google Slides does not have audio recording built-in, but the good news is it’s pretty easy to add audio to Google Slides. You don’t even need any technical skills really. To have a narration with your presentation, you have to create the audio file(s) separately and then upload the file(s) to add audio to your Google Slides. Or alternatively, you can use a screen recording plugin like VEED that will let capture your presentation on your desktop screen while you speak over it and record the whole thing to share with others.
Don’t worry — it’s easier than you might think. I’m going to show you exactly how to add voice and audio to Google Slides presentations.
Types of Audio You Can Add to Google Slides
Before I get into the step-by-step process of adding audio to a Google Slides presentation, let’s take a second to go over some ideas for the different kinds of audio you might want to consider using in your slideshow. Each type serves a unique purpose and can elevate your presentation in different ways.
Narration: Adding Voiceovers to Slides
Think of narration as your personal guide through the presentation. It’s your voice providing context, explanations, and insights as your audience navigates each slide. Whether you’re delivering a complex technical concept or sharing a heartfelt story, narration humanizes your content.
If you’re adding narration to a Google slideshow, make sure you focus on the following:
- Scripting: Craft a clear, concise script that complements your visuals.
- Tone: Adjust your tone to match the content—be it informative, enthusiastic, or empathetic.
- Practice: Rehearse your narration to ensure a smooth, engaging delivery.
- Recording Tools: Utilize quality recording tools and consider investing in a good microphone for pristine audio.
Background Music: Enhancing the Atmosphere
Background music provides ambiance and sets the mood. It can make your presentation feel dynamic, cinematic, or simply pleasant. The right music can keep your audience engaged and emotionally connected to your content.
Consider the following when adding background music to Google Slides:
- Genre: Choose music that aligns with your presentation’s theme and message.
- Volume: Ensure the music doesn’t overpower your narration or visuals.
- Transitions: Use music strategically during transitions to maintain flow.
- Royalty-Free Sources: Explore royalty-free music libraries for legal and diverse music options.
Sound Effects: Using Audio Cues for Emphasis
Sound effects can be a great tool for adding emphasis and engagement to your presentation. When used correctly (and sparingly), they grab your audience’s attention, highlight key points, or add humor. From subtle chimes to dramatic crescendos, sound effects can punctuate your presentation.
Consider the following when adding sound effects to Google Slides:
- Relevance: Ensure sound effects and audio clips enhance the content and align with your message.
- Timing: Precisely time sound effects for maximum impact, emphasizing key moments.
- Consistency: Maintain a consistent style, tone, and volume level with sound effects throughout your presentation.
- Moderation: Avoid overusing sound effects in your slide deck, as too much can be distracting.
4 Steps to Add Audio & Voice Over to Google Slides
- How to Use Google Slides →
- Matching Audio Narration with the Slide Presentation →
- Recording Your Voice →
- Adding Audio Files to Google Slides →
1. How to Use Google Slides
Google Slides is a presentation program that is part of the Google Suite of productivity tools. It allows users to create, edit, and share presentations online.
Google Slides is similar to other presentation programs such as Microsoft PowerPoint and Apple Keynote. However, it has some unique features that make it a powerful tool for creating and delivering presentations, like its collaborative features and templates.
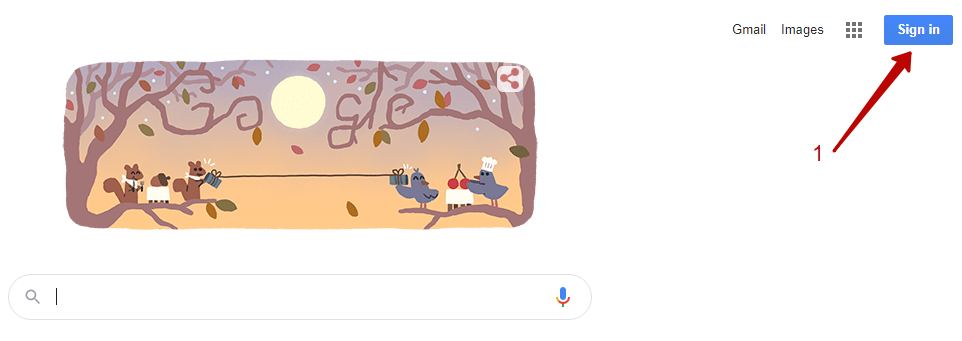
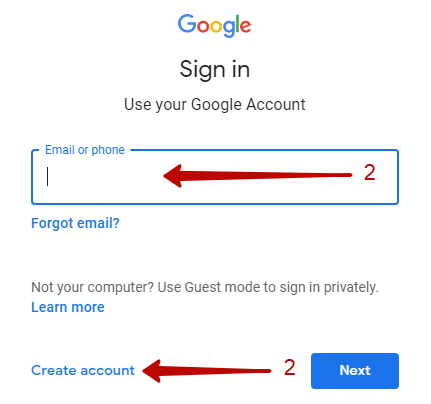
If you need a Google account and do not want a Gmail account, just go to Google.com and click the “Sign In” icon in the upper right corner of the browser window and then select “Create account” to set up a new account. You can link your existing email account to your Google account. It does not have to be a Gmail account.
Alternatively, you can get a free Gmail account and never use it except to give you access to Google Drive and Google Tools, including Google Slides, if that is all you want to do.
After you establish your Google (or Gmail) account you will see a tiny icon made up of nine tiny squares in a grid pattern located in the upper right corner of an open browser window on Google.com. Click this icon and it will show the choices of Google Tools available. Scroll down to select Google Slides.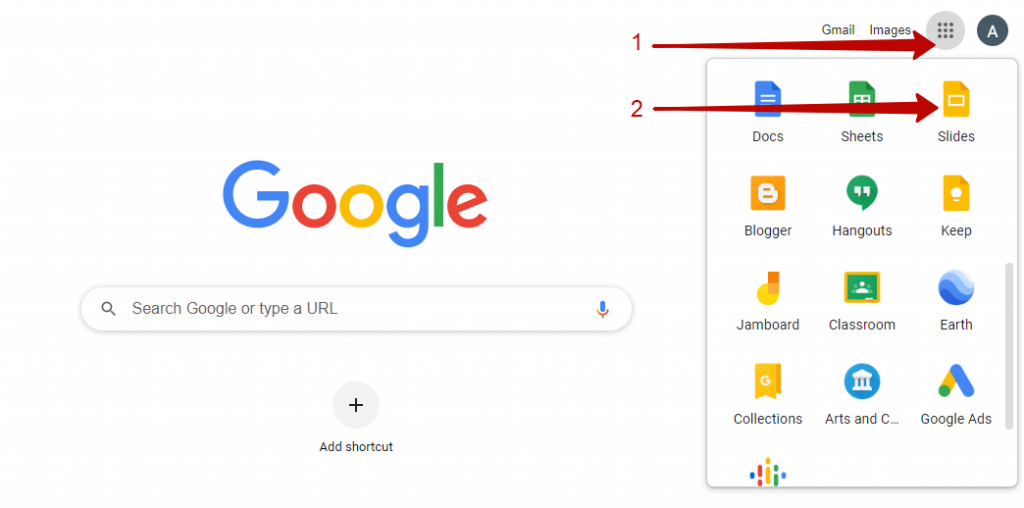
For the purposes of this tutorial, let’s assume you have a Google Slides presentation already made and you just need to add audio to it.
2. Matching Audio Narration with the Google Slide Presentation
If you want to use narration for a full continuously-playing slideshow, write the script that you will use for all the slides and then watch the slide presentation playback as a slide show to get the timing or your narration to match the progression of the slide as the slideshow plays. This is probably the trickiest part of the whole process.
You will want to edit your script and/or change the playback speed of the slides to match your audio recording of the narration.
Practice reading your script with the slides running in the slideshow mode until you can read the script perfectly.
It is easier to work with the audio file for a slideshow that plays without stopping if you can record the audio narration in one take rather than piecing a bunch of short takes together.
If your video presentation is long or the viewer uses self-pacing to manually click through the slides, you can break up the audio playback into sections or have a separate audio file for each slide. In that case, you need to make sure the audio recordings match, in terms of sound quality.
You want to listen to the audio playback carefully to be certain that the narration playback sounds nice and smooth to the listener. You want to avoid any abrupt volume or tonal changes between slides that may create a distraction or startle the listener.
Problems may arise if the audio recording sessions are in different places under different sounding conditions. To avoid problems, try to record in the same way and the same place if you plan to use separately recorded audio files together in the same presentation. Otherwise, not only will your audio potentially sound disjointed, but it could be an editing nightmare trying to get everything to blend together seamlessly.
3. Recording Your Voice
To record your voice, you can use a free-to-use recording application such as Audacity or a free recorder such as Movavi or another free online recorder. Also, most smartphones have an app to record your voice, which is easy to use.
Another option is to use VEED for more of a live presentation recording.
VEED is an app that has screen recording capabilities, which allows you to record a live voiceover to your Google Slides presentation and then save and share the video file with others. You can screen record on Windows or Mac with this plugin.
Be sure to record your voice in a quiet place with little or no background noises when trying to add audio to Google Slides presentations.
Speak clearly and directly into your voice over microphone in a clear natural voice – a headset microphone is great for this kind of narration work. Do not overdrive the recording by speaking too loudly and also do not speak too softly. Excessively quiet audio requires adding too much gain later (to increase the sound volume), which may introduce unwanted noise or distort your audio, making it difficult for your audience to follow along and even harder to create captions or a transcript with transcription software.

If you want to add background music or sound effects you will want to use a program like Audacity or another audio editing software to bring those things together into one audio file as a balanced audio mix. If you are getting serious about this effort, review our tips on how to create a professional voiceover recording home studio.
4. How to Add Audio to Google Slides
Once you create your audio file(s), then you upload the files to your Google Drive so that they are stored on the Google Cloud and available for Google Slides to access them. Most virtual conference platforms and webinar software will allow you to upload pre-recorded presentations with voiceovers.
Upload the Audio File(s)
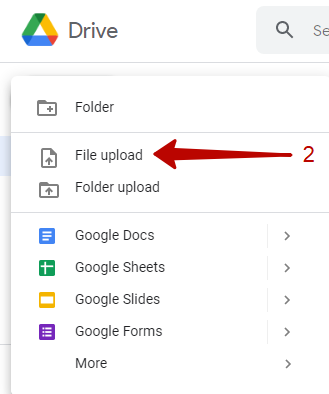
To upload audio files to Google Drive, select the triangular Drive icon from the Google Tools menu (to see the tools menu use the grid button in the upper right-hand corner of your browser) and then click on the “New” button and select “File Upload” and then choose the audio file from your device. Wait for the upload to complete before you attempt to use the audio file.

Share the Audio File(s)
Share the audio file by right-clicking on its filename on Google Drive and then click on “Share.” Allow access to anyone with the link to remove restrictions on the use of this file. This gives access to the audio files to your Google Slides viewers. Be careful. This important step is often overlooked. When you share a Google Slides presentation without also sharing the audio files, your viewers can’t hear them.
Insert Audio File(s) to Google Slides
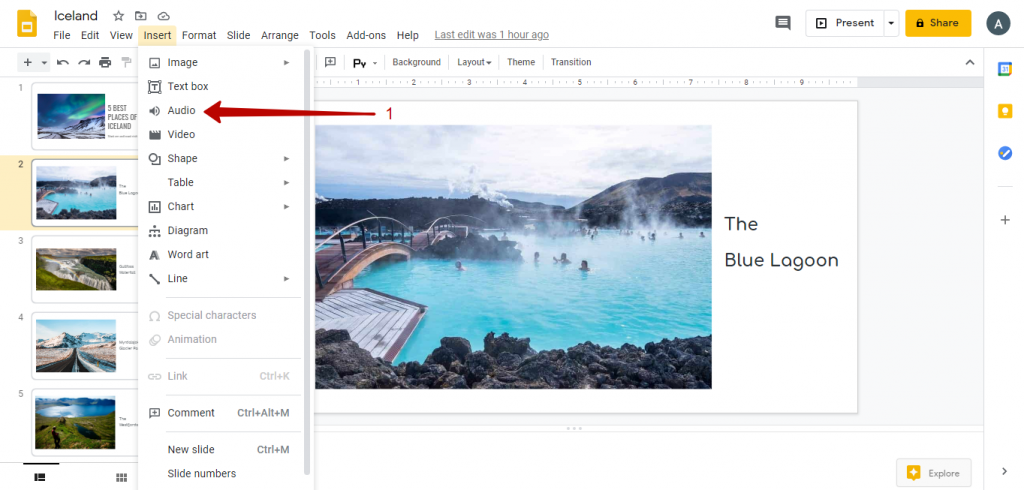
Open the Google Slides file that you want to use or create a new one. Choose the slide where you want to insert audio. Then, from the menu choices select “Insert” and scroll down to select “Audio.” Click the audio file you saved to your Google Drive to select it and then click the “Select” button.
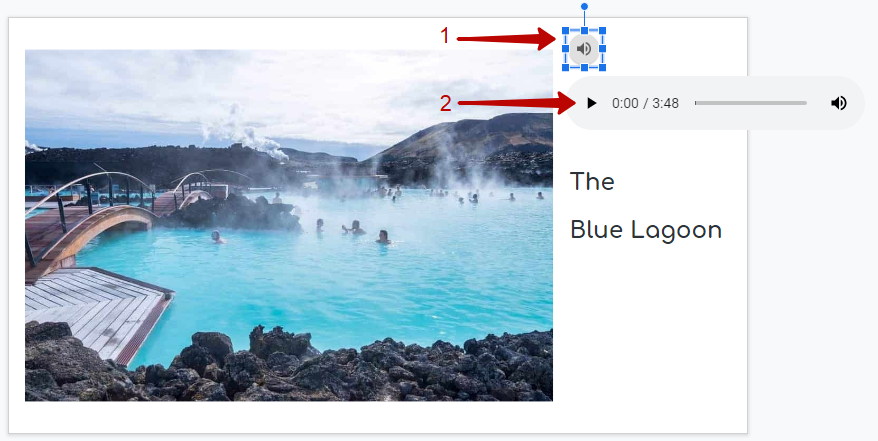
After you insert audio into your Slides presentation, you will see a little speaker-shaped icon appear on your slide. You can play the audio by clicking on the speaker icon. You can change the placement of the speaker icon by dragging it to a different position on the page.
Audio Format Adjustments
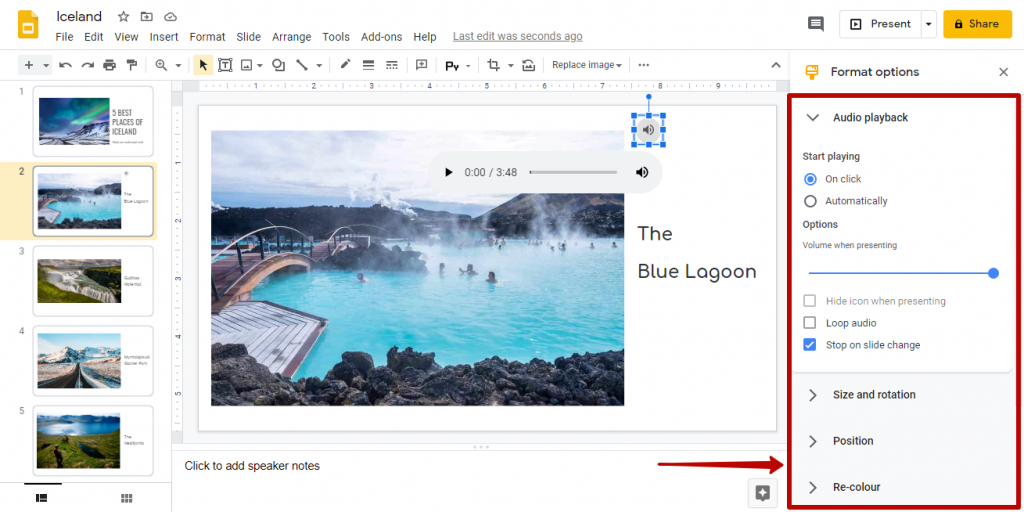
Within Google Slides there are some basic sound adjustments available when you add audio files. When the audio object is selected you can click on “Format Options” in the toolbar. There you will see the default settings appear and the adjustments that can be made.
The adjustments include the volume of the audio file playback. You can choose whether the audio file will play automatically or if it requires a click to start it. If you choose “start playing automatically,” then you can also choose to hide the speaker icon since it is no longer necessary as the audio plays on its own.
You can also choose to loop audio if you want it to continuously repeat. You can stop the audio on a slide change if you only want the audio to be available for just one slide. If you uncheck this box not to stop audio on slide change, the audio will continue to play when the slide changes.
Audio Preview
While you are in the editing mode making slides, you can preview the inserted audio by clicking on the speaker icon and then clicking on the play button.
Watch this video by Stephen Kwiecinski. He shows three different ways to add a voiceover to Google Slides using Audacity.
BONUS for Teachers
New EdTech Classroom’s Sam Kay shows how to use free Google Slides Add-Ons to make interactive slide presentations. Add-Ons are made by third-party software developers to add features and make your slide presentations more interesting. He suggests you use Pear Deck to add audio to your slides.
Dos and Don’ts of Adding Audio to a Google Slides Presentation
Now that you understand how to add audio into Google Slides presentations, let’s go over some quick tips and best practices for using it:
These tips will save you from potential audio mishaps and elevate your presentation game.
The Dos:
- Do Script Your Narration: If you’re adding voiceovers, script them thoughtfully. A well-written script keeps your narration concise, on-point, and engaging. Practice your delivery to sound natural and confident.
- Do Balance Audio Levels: Ensure a harmonious blend of audio elements. Your narration should be clear and audible, while background music and sound effects should complement, not overpower.
- Do Time Sound Effects Strategically: Timing is everything with sound effects. Use them to emphasize key points or transitions. When executed right, they can add a dynamic touch to your presentation.
- Do Test Your Audio: Always, always test your audio setup before the actual presentation. Check for volume levels, audio quality, and any potential technical glitches.
- Do Provide Closed Captions: For inclusivity, consider providing closed captions for your narration. It ensures that your content is accessible to all audiences, including those with hearing impairments.
The Don’ts:
- Don’t Go Crazy with Sound Effects: It’s tempting to go wild with sound effects, but resist the urge. Too many can overwhelm your audience and detract from your message.
- Don’t Use Copyrighted Music Without Permission: Unless you have the rights or use royalty-free music, avoid incorporating copyrighted music into your presentation. You don’t want to deal with any nasty legal issues.
- Don’t Neglect Audio Quality: Poor audio quality is a presentation buzzkill. Invest in a decent microphone and record in a quiet space to ensure clear narration.
- Don’t Rush Narration: Speak at a steady, comprehensible pace. Rushed narration can leave your audience struggling to keep up.
- Don’t Distract with Inconsistent Audio: Maintain a consistent style and tone with audio elements throughout your presentation. Sudden changes in volume or style can be jarring.
FAQ
Can you record audio in Google Slides?
No, Google Slides doesn’t currently have a built-in audio recording feature. However, Google Slides does have the option to insert audio into a presentation, meaning you can record your audio separately outside of Google Slides and add it easily.
Can you do voice overs on Google Slides?
Yes, you can add voiceovers to your Google Slides presentation by recording it separately and inserting it into the presentation. Once you’ve recorded your voiceover, you can insert the output file with just a couple of clicks.
Why can’t I add audio to Google Slides?
If you’re running into issues adding audio in Google Slides, it might be because you’re trying to use a file type that’s not supported or you don’t have the right permissions to add audio to your presentation. Make sure you’re using a supported file type and that you have the correct permissions for inserting audio and making edits before trying again.
What audio files can be added to Google Slides?
Currently, you can insert audio in Google Slides if it’s a .wav or .mp3 file type. Inserting audio files that aren’t .wav or .mp3 will likely result in an error.
Final Notes on Adding Audio to Google Slides
As you can see, it’s actually pretty easy to add audio to your Google Slides presentations. There’s no need to be intimidated, even if you never made any voiceover recordings. After a little bit of practice, you will quickly get the hang of how it all works.
It is fun to add audio and voice to your Google Slides, and it’s an easy way to create instructional videos.
As you become more confident you can learn how to mix in background music as well.
You can even add GIFs to Google Slides presentations.
Not a Google Slides fan? You can also easily add audio to PowerPoint presentations in a similar fashion.
If you have issues with syncing audio and video recorded separately check out 11 ways on how to do it.
Have more questions about recording voice overs? Check out our guide to the best voice over training courses to improve your skills.
Still need help trying to add audio to a Google Slides presentation? Comment below with your concerns so we can help you out.

